13 Modern Kitchen Lighting Ideas That Actually Transform a Space
Lighting is the most underestimated element in kitchen design. Get it right and the whole room changes. These 13 ideas show you exactly how.
Most kitchen renovations spend a lot of time on cabinets, countertops, and tiles. Lighting usually gets figured out at the end with whatever budget is left over. That is a mistake.
Lighting determines how your kitchen looks at 7pm on a Tuesday in November. It affects how food looks when you are cooking it, how comfortable the space feels to spend time in, and how well your expensive backsplash actually shows up. A kitchen with great materials and bad lighting can feel worse than a kitchen with average materials and great lighting.
These 13 ideas cover everything from the practical fundamentals to the finishing touches that make a kitchen genuinely special to be in.
The Fundamentals
Ideas 1–4A Proper Layered Lighting Plan
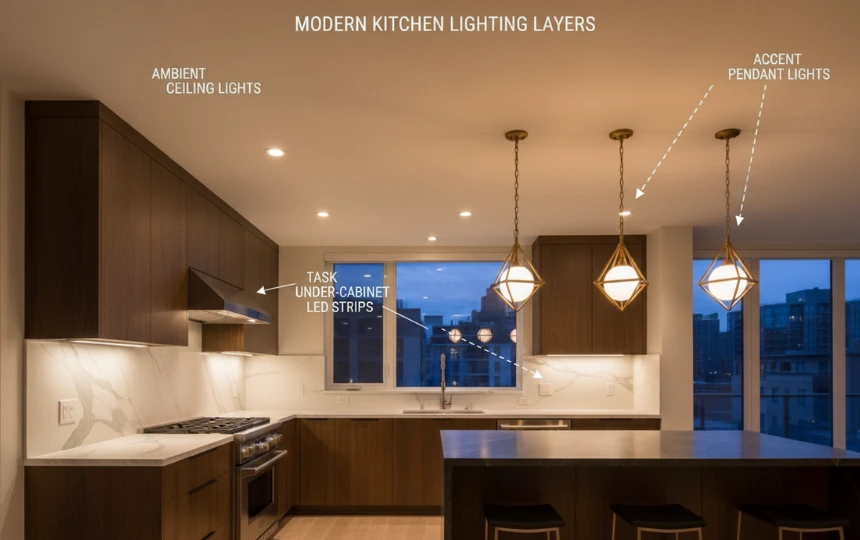
Before you choose a single fixture, you need a lighting plan. And that plan should have three layers.
Ambient lighting is the general overhead light that fills the room. Recessed cans, a flush ceiling fixture, or a statement pendant can all serve this purpose. Task lighting is the focused, bright light that illuminates your work surfaces. Under-cabinet strips are the best example. Accent lighting is everything that adds atmosphere. Lit glass-front cabinets, toe-kick strips, and cove lighting all fall here.
Most kitchens have ambient lighting and nothing else. That single layer is why they feel flat and functional rather than warm and inviting. The moment you add task and accent lighting on separate dimmer circuits, the kitchen transforms.
Plan all three layers before any wiring is done. Retrofitting lighting after walls are closed is expensive and disruptive. Get an electrician involved at the design stage, not at the end.
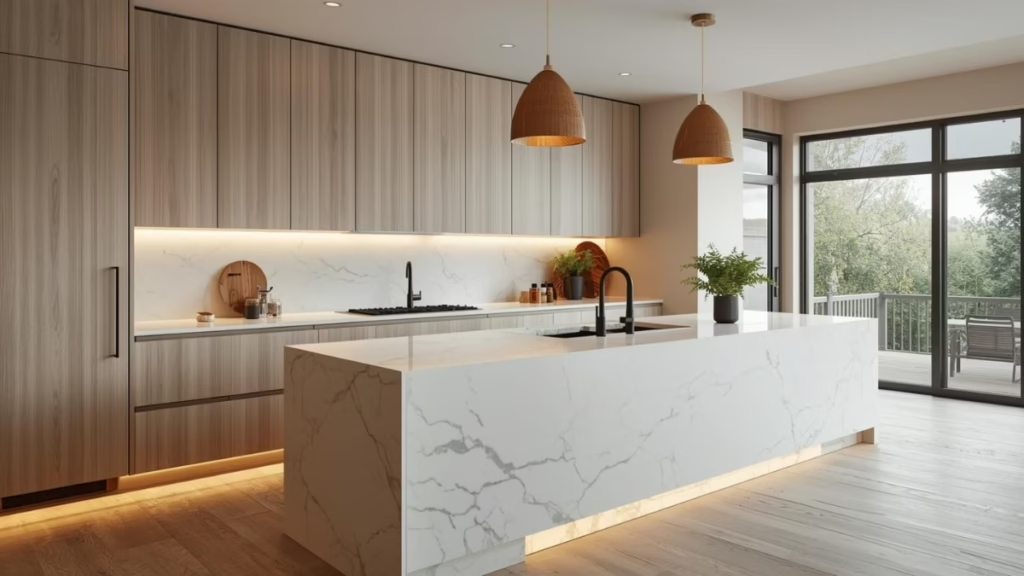
Under-Cabinet LED Strips
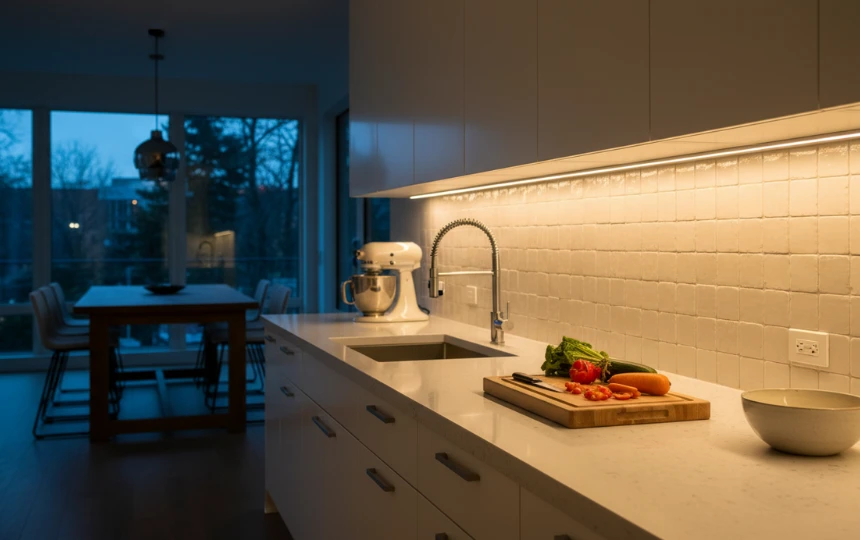
Under-cabinet lighting is the single highest-return upgrade in kitchen lighting. If you do nothing else on this list, do this.
Without it, your body blocks the overhead light the moment you stand at the counter. Every food prep task happens in your own shadow. It is a surprisingly unpleasant way to cook that most people accept because they have never experienced the alternative.
A continuous LED strip mounted just inside the front edge of the upper cabinets eliminates every shadow. The countertop is evenly lit. The backsplash glows. The whole kitchen looks better and functions better at the same time.
Color temperature is critical here. Choose 2700K to 3000K. That is the warm, incandescent-like range that flatters food, skin, and most kitchen materials. Avoid anything above 3500K. It makes kitchens feel like offices.
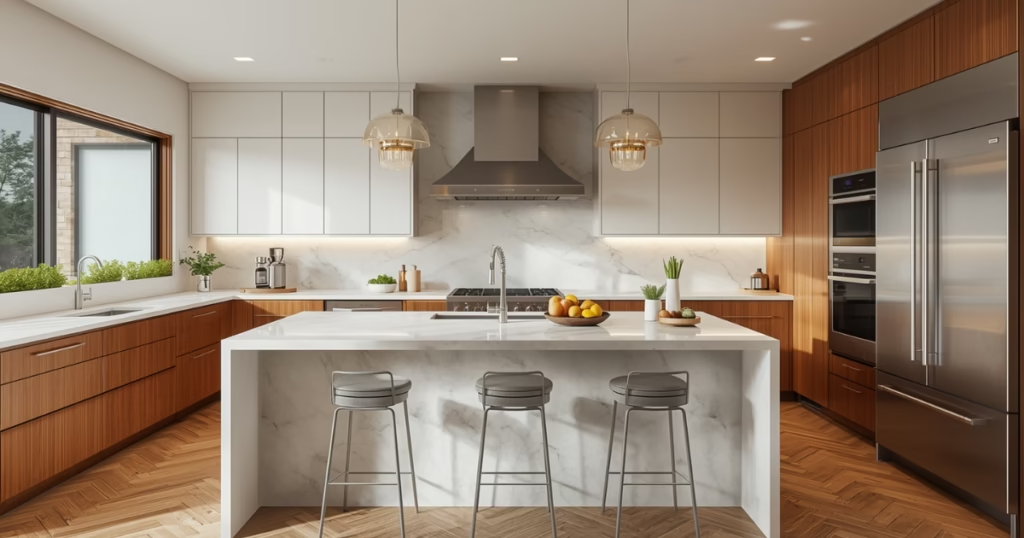
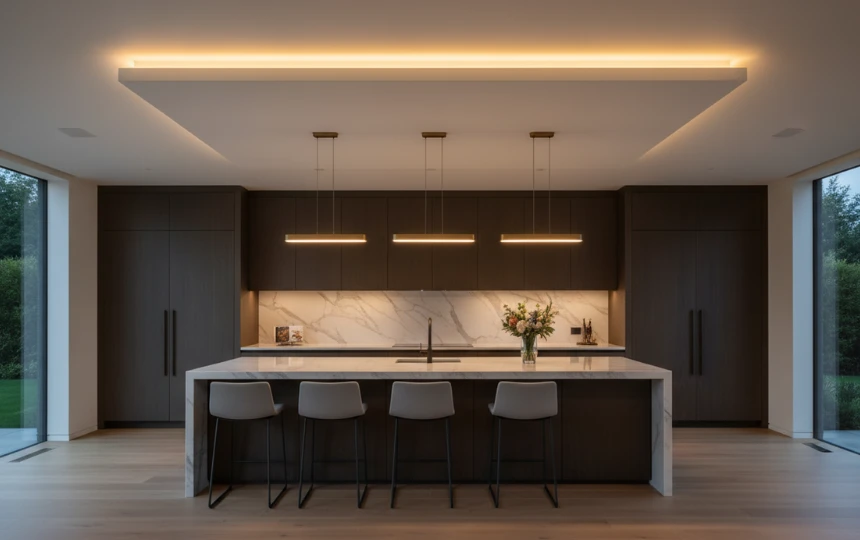
Statement Pendant Cluster Over the Island
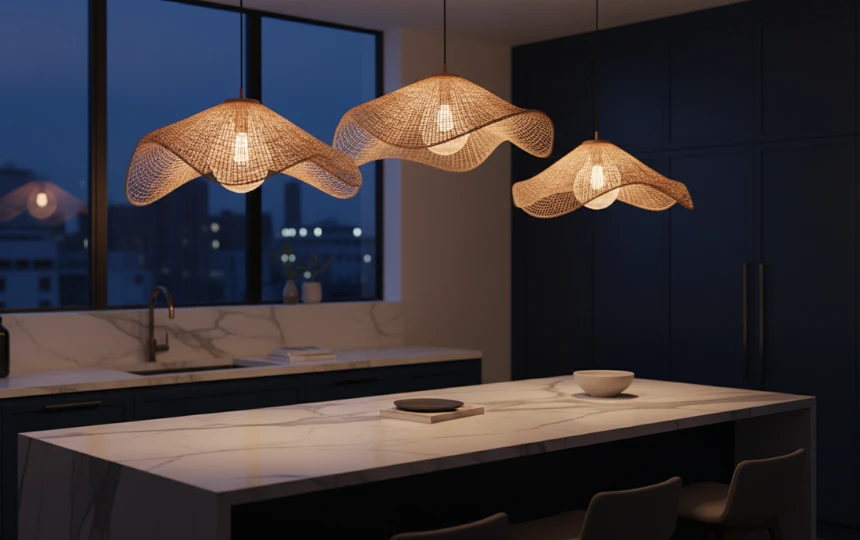
Pendant lights above an island are the jewelry of the kitchen. They are functional, yes. But they are also the one lighting element everyone actually notices and comments on.
Two or three pendants hung over an island creates a collected, layered look that a single large fixture cannot achieve. Hang them at slightly different heights. The variation looks intentional and gives the cluster a sense of depth.
Scale matters more than most people realize. Pendants that are too small look tentative and unanchored, like an afterthought. Each pendant over a standard island should be at least 8 to 10 inches in diameter. For a large island, 12 to 14 inches is better.
The material of the pendant should complement rather than exactly match the rest of the kitchen hardware. Rattan pendants in a brass-hardware kitchen. Smoked glass in an all-black kitchen. Aged brass pendants in a white and oak kitchen. A slight contrast reads as more considered than a perfect match.
Recessed Ceiling Grid Done Right
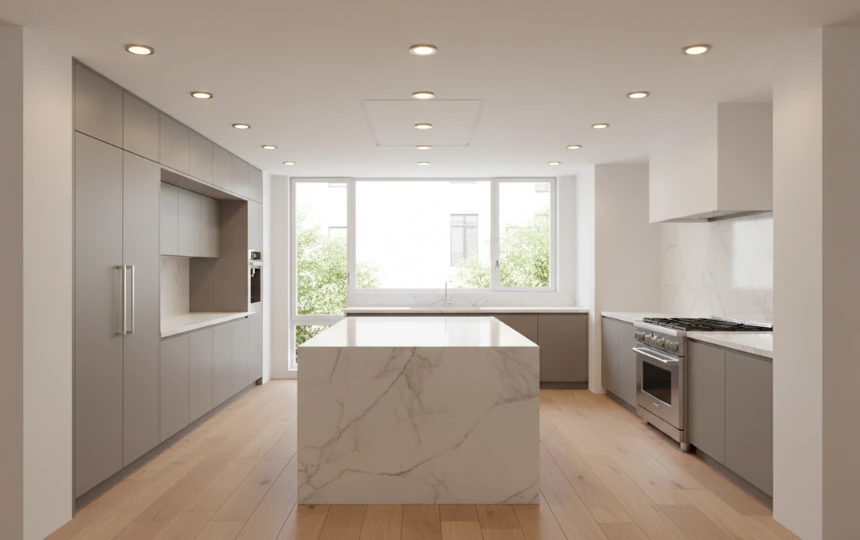
Recessed ceiling lights are the most common kitchen lighting choice. They are also the most commonly done badly.
The typical mistake is placing cans in a grid pattern that covers the ceiling evenly without thinking about where the light actually needs to land. Lights over the center of the ceiling illuminate the middle of the room. Lights over the countertops and work zones are what you actually need.
Position recessed lights 12 to 18 inches from the wall to light the countertops effectively. Add lights over the island independently from the perimeter. Put each zone on a separate dimmer circuit so you can control them independently.
On aperture size: use 4-inch cans in a standard 9-foot kitchen. They look more refined and modern than 6-inch cans. Specify IC-rated, airtight housings with high-CRI LED modules (CRI 90 or above). The CRI number determines how accurately the light renders colors. Below 90 and food looks less appetizing. Above 90 and everything looks as it should.
| Color Temp | Feel | Best For | Avoid In |
|---|---|---|---|
| 2700K | Warm, candlelight-like | Ambient, accent, pendants | Detailed food prep zones |
| 3000K | Warm white, inviting | Under-cabinet, recessed | Anywhere you want true warmth |
| 3500K | Neutral, transitional | Utility kitchens, high use | Open-plan living areas |
| 4000K | Cool white, clinical | Commercial kitchens | Almost all residential kitchens |
| 5000K+ | Daylight, harsh | Specialist task use only | Any kitchen where you eat or entertain |
Character & Atmosphere
Ideas 5–10Sculptural Range Hood as a Light Source
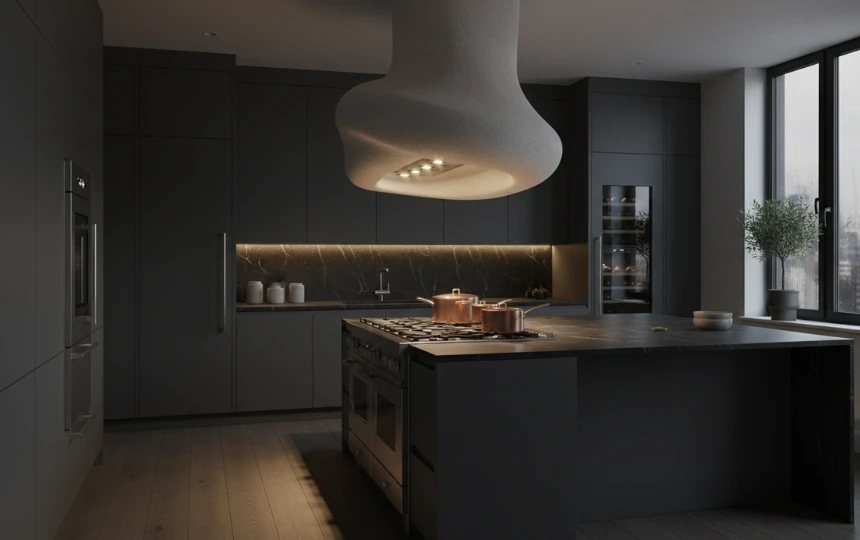
The range hood is the most underused design opportunity in the kitchen. Most people choose a standard stainless or painted metal insert and move on. That is a shame, because the hood occupies a highly visible position and has a natural reason to include built-in lighting.
A custom plaster hood, hand-hammered copper canopy, or sculptural blackened steel chimney makes the cooking zone the architectural focus of the kitchen. Many custom hoods also include integrated downlights that wash the cooktop far more effectively than the generic halogen inserts found in standard hoods.
The hood accounts for roughly 10 to 15 percent of the kitchen’s visual field. That is a significant surface to leave as an afterthought. Spending well here pays visual dividends every time you look at the kitchen.
In-Cabinet Lighting for Glass-Front Displays
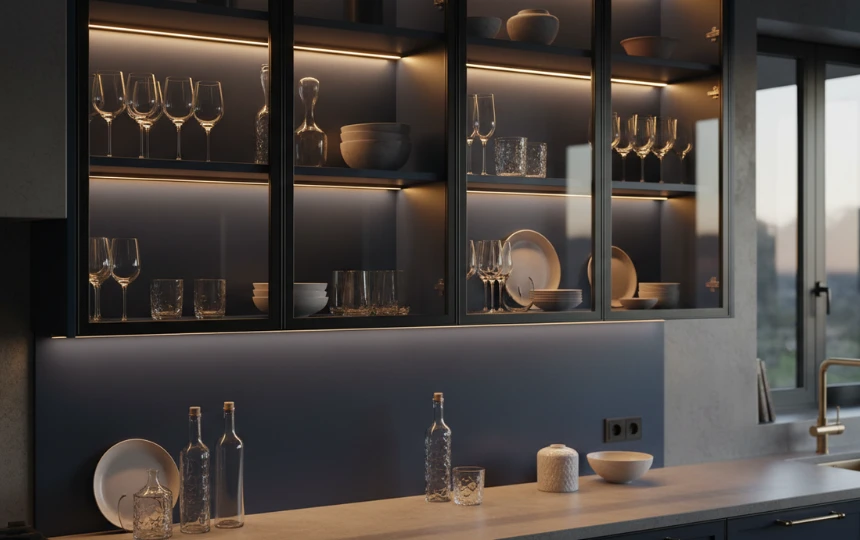
Glass-front cabinets lit from the inside are one of those details that changes a kitchen at night completely.
When the overhead lights are dimmed and the cabinet interiors glow, the kitchen gains a warmth and depth that daytime photographs never quite capture. The lit cabinets act like small illuminated boxes. They draw the eye. They make the room feel considered in a way that is difficult to articulate but immediately felt.
Paint the interior of the cabinet in a contrasting color to amplify the effect. Navy inside a white cabinet. Black inside a sage green cabinet. The contrast makes the objects inside pop against the dark background.
You do not need this on every glass-front cabinet. Two or three lit cabinets clustered together on one wall is enough. More than that starts to look like a display case rather than a kitchen.
Toe-Kick LED Strip
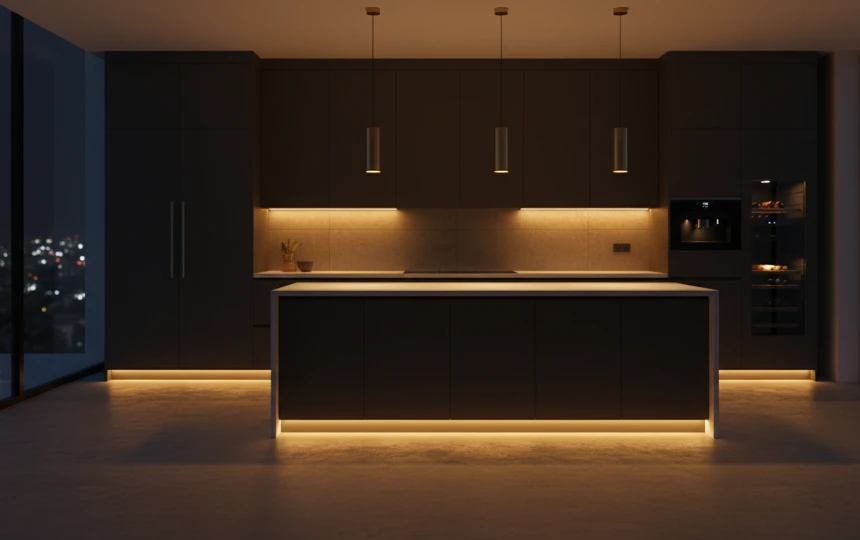
Toe-kick lighting is one of those details that costs very little and looks disproportionately good.
A thin LED strip installed inside the recessed toe-kick at the base of the cabinets creates a wash of warm light across the floor. The cabinets appear to float slightly. The floor glows. At night with the overhead lights off, it gives the kitchen an atmosphere that feels expensive and serene.
It is also genuinely practical. If you have ever gotten up for a glass of water at midnight and fumbled for a light switch, toe-kick lighting on a motion sensor solves that problem entirely. Enough light to navigate the kitchen without waking anyone up.
Use a warm color temperature (2700K) and keep the brightness low. This is accent lighting, not task lighting. The point is atmosphere, not illumination.
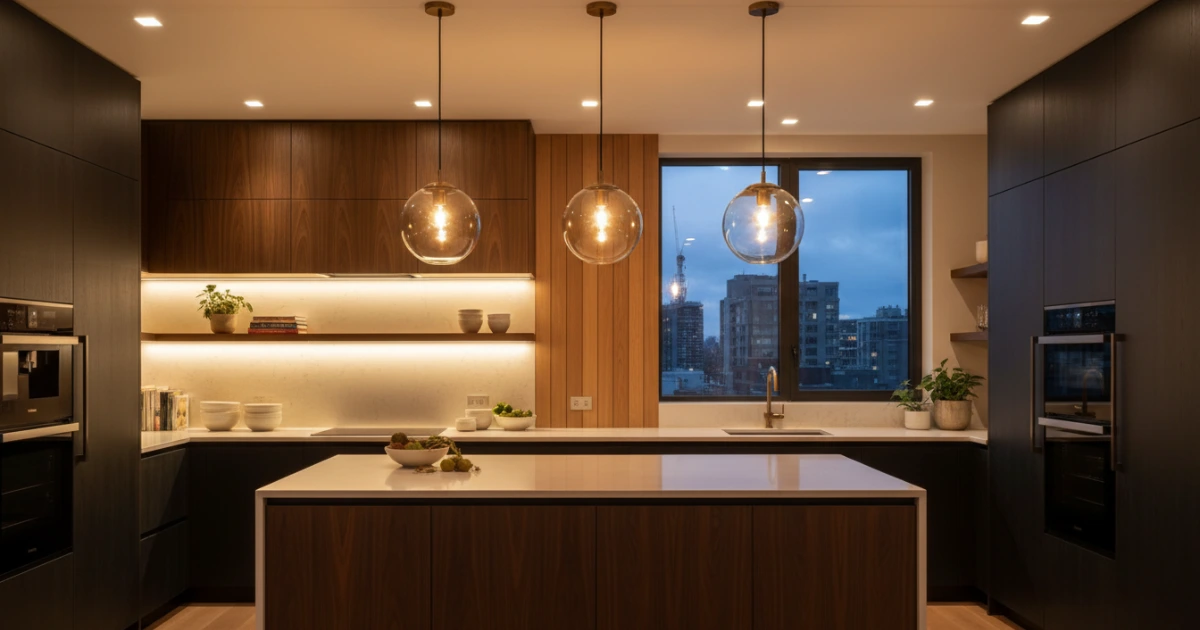
Linear Suspension Light Over the Island
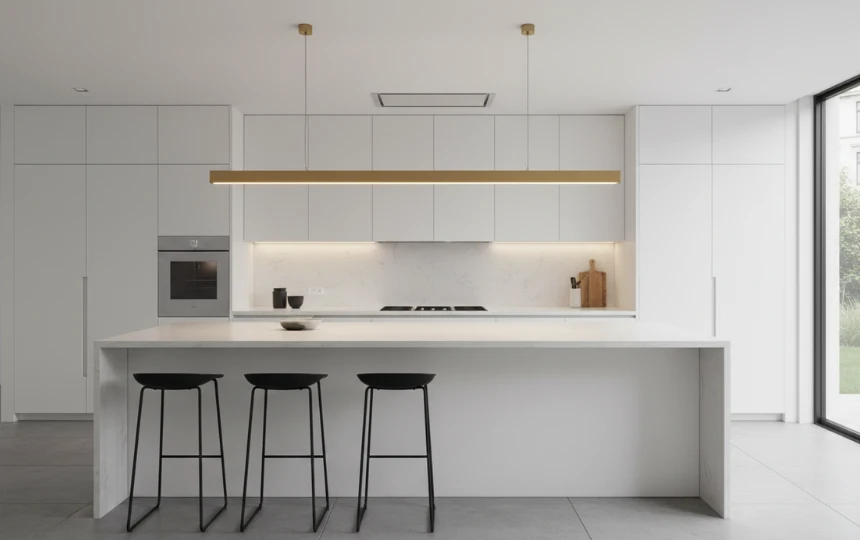
A single linear pendant spanning most of the island length is a cleaner, more architectural alternative to a cluster of individual pendants.
It suits minimalist and contemporary kitchens particularly well. Where a pendant cluster adds warmth and layered character, a linear suspension light adds clarity and precision. The light washes evenly across the entire island surface rather than pooling in circles beneath each pendant.
Proportions matter here. The linear light should be roughly 60 to 75 percent of the island’s length. A 72-inch island works well with a 48 to 54-inch light. Too short and it looks lost. Too long and it becomes the entire visual story of the kitchen rather than one considered element within it.
Matte black and brushed brass are the most popular finishes right now. Both work well against most cabinet colors. Brushed brass adds warmth. Matte black adds definition.
Warm Dimmable Zones: The Evening Kitchen
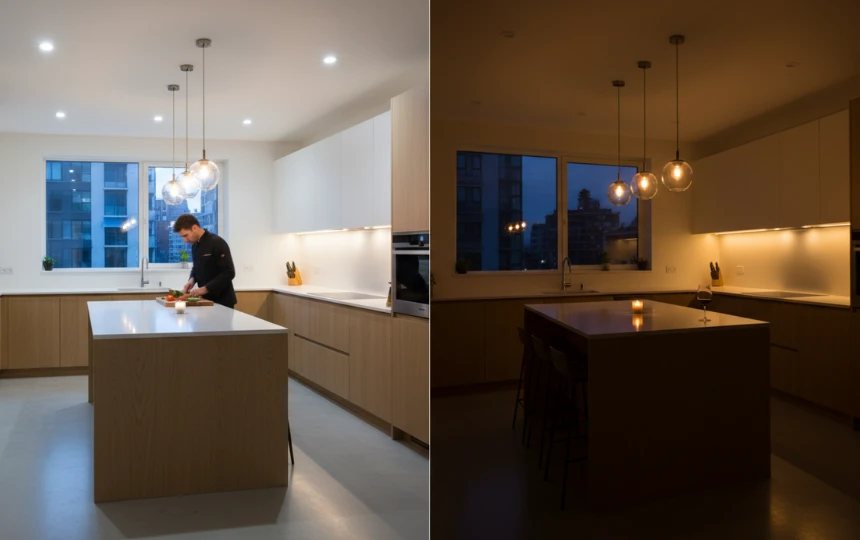
A kitchen used for cooking lunch and a kitchen used for hosting dinner should feel like different rooms. The only way to achieve that without physically changing anything is dimmers.
The principle is simple. Task lighting on full during prep and cooking. Ambient lighting at 20 to 40 percent during meals. Accent lighting only in the evening. Each circuit on its own dimmer, adjusted for each moment.
This is the single biggest quality-of-life improvement in kitchen lighting that costs almost nothing extra. Dimmers add a modest amount to an electrical budget. The difference they make to how the kitchen feels throughout the day is significant.
The only practical requirement is planning the circuits correctly before installation. Every lighting zone needs its own circuit and its own dimmer. This is something to sort out with your electrician at the rough-in stage, not at the end.
Ceiling Coffer With Cove Lighting
A ceiling coffer is a recessed architectural frame built into the ceiling, typically above the island or dining zone. Cove lighting hidden inside the coffer projects light upward and outward, creating a soft, indirect glow around the perimeter of the recess.
The effect is genuinely beautiful. The ceiling appears to float. The island zone is defined without any walls or screens. The light is warm and diffuse rather than direct and harsh.
This is a construction-stage decision. It requires framing work before the ceiling goes in. But in open-plan kitchens where you want to visually separate the kitchen from the living area without building a wall, a ceiling coffer with cove lighting is one of the most elegant solutions available.
Budget for it as a structural element rather than a lighting element. The cove strip itself is inexpensive. The carpentry and drywall work to create the coffer is where the cost sits.
The One Thing Most Kitchen Lighting Plans Get Wrong
They treat it as a single decision rather than a system. One overhead light, one switch, one level of brightness for every moment of the day. Good kitchen lighting is a collection of independently controlled layers that work together. Ambient. Task. Accent. Each on its own dimmer. Each serving a different purpose. None of them doing the other’s job. Get that structure right and even modest fixtures will make the kitchen feel special.
The Finishing Touches
Ideas 11–13Prioritize Natural Light Before Any Fixture
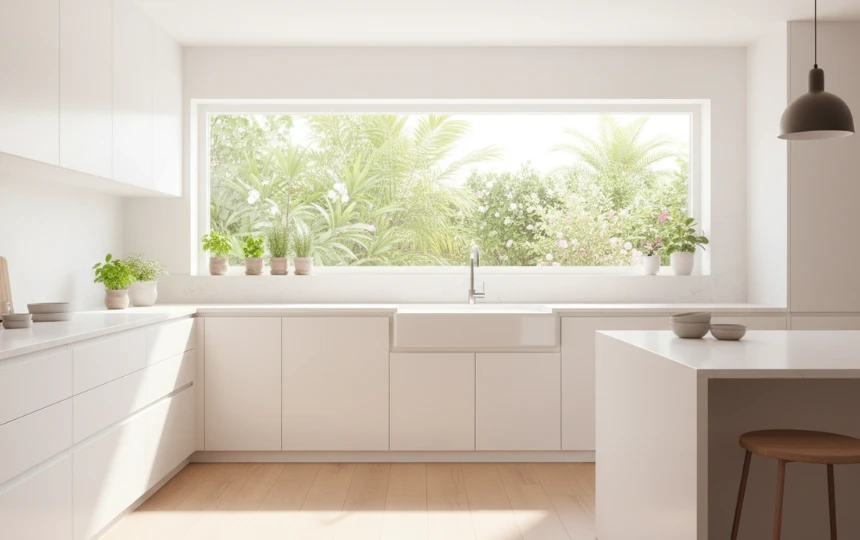
No artificial light source replicates natural light. It is worth stating plainly, even in a guide about electric lighting.
If your kitchen has a window above the sink that could be enlarged, it is almost always worth doing. The quality of light that comes through a larger window changes how the whole room feels. The ingredients look better. The space feels bigger. The kitchen is simply more pleasant to be in.
Remove window treatments where privacy allows. Bare glass is cleaner, more modern, and lets in significantly more light than even a sheer curtain. If the window looks onto a neighbor’s wall, a privacy film on the lower half of the glass is a better solution than blocking the whole window with fabric.
Skylights are worth considering in kitchens under a single-story roof. A single skylight can transform a dark kitchen more dramatically than any combination of artificial fixtures.
Integrated Open Shelf Lighting
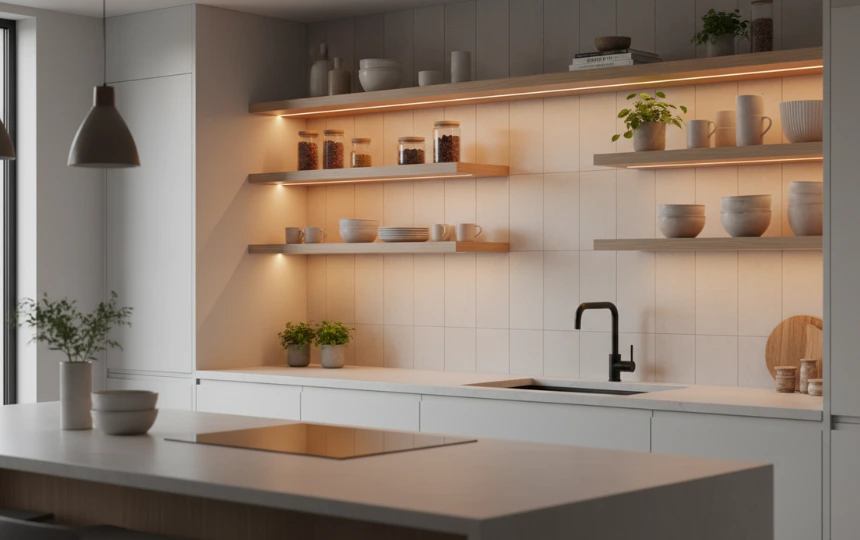
Open shelving already adds warmth and character to a kitchen. Lighting those shelves from below takes them to another level entirely.
A thin LED strip integrated into the underside of each shelf creates a warm downward glow that illuminates the objects on the shelf below. Ceramics, glassware, olive oil bottles, and plants all look better lit from above. The effect is similar to how objects are lit in a well-designed retail environment.
The strip needs to be recessed or concealed in a small aluminum channel mounted to the underside of the shelf. Visible strips look messy. Concealed ones look like the light simply comes from somewhere indefinite, which is exactly what you want.
Connect shelf lighting to the accent circuit so it can be controlled independently. At full brightness during cooking. At low warmth during the evening when the objects on the shelf are the feature rather than the tools.
Smart Lighting Control
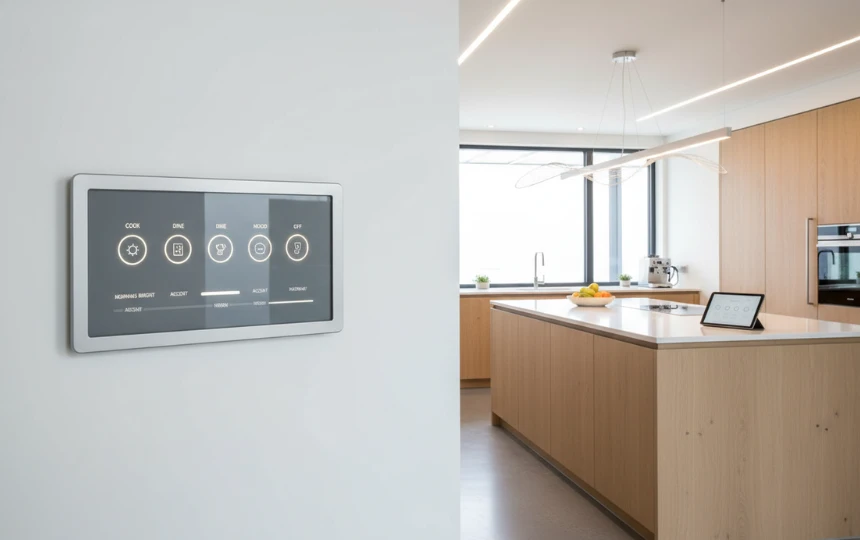
Smart lighting control is not about novelty. It is about making a well-designed lighting plan effortless to actually use.
The problem with multiple dimmer circuits is that using them properly requires adjusting three or four switches every time the purpose of the kitchen changes. In practice, most people just use the main light because it is easier. Smart control collapses all of that into a single button.
One button press for “cooking.” Another for “dinner.” Another for “evening.” Each preset triggers the right combination of circuits at the right levels. Lutron Caseta is the most reliable and widely compatible system at the residential level. It works with most smart home platforms and the dimmers are genuinely excellent at handling LED loads without flicker.
You do not need smart lighting to have great kitchen lighting. But if you have invested in multiple circuits and quality fixtures, smart control ensures you actually use them as intended every day rather than just on the days you can be bothered to adjust four separate dimmers.
Light the Kitchen You Actually Want to Be In
Kitchen lighting is not complicated. But it does require thinking about it as a system rather than a collection of individual fixtures.
Start with the three layers. Plan your circuits before the walls close. Choose a warm color temperature and specify high-CRI bulbs. Then choose fixtures that suit the style of the kitchen. In that order.
The fixtures are the easy part. The plan is what makes them work.
Frequently Asked Questions About Kitchen Lighting
The best kitchen lighting combines three layers: ambient lighting for general illumination, task lighting for work surfaces, and accent lighting for atmosphere. No single fixture type can do all three jobs. Recessed downlights or pendants handle ambient lighting. Under-cabinet LED strips handle task lighting. Toe-kick strips, lit glass cabinets, and shelf lighting handle accent. Each layer on its own dimmer circuit makes the system genuinely versatile.
2700K to 3000K is the right range for most residential kitchens. This is the warm white range that flatters food, skin tones, and most kitchen materials. It feels inviting rather than clinical. Avoid 4000K and above in kitchens where you also eat and entertain. It is fine in commercial kitchens but feels harsh and office-like in a home setting. Always specify LED modules with a CRI of 90 or above so colors render accurately.
Two to three pendants is the standard for most islands. For an island under 5 feet long, two pendants work well. For an island 5 to 8 feet long, three pendants is better. Space them evenly, leaving roughly 6 to 12 inches from each end of the island. Hang the bottom of each pendant 30 to 36 inches above the countertop surface. For a cleaner, more architectural look, a single linear suspension light spanning the island is an equally valid alternative.
Yes, always. Dimmers are one of the highest-return investments in kitchen lighting. They allow the same fixtures to serve completely different purposes throughout the day. Task lighting at full brightness for cooking. Ambient lighting at 30 to 40 percent for dining. Accent only in the evening. A kitchen without dimmers is stuck at one level of brightness all day, which inevitably means a compromise between too bright for evenings and too dim for cooking.
Place recessed lights 12 to 18 inches from the wall to illuminate countertops effectively. Position lights over the island on a separate circuit from the perimeter lighting. Avoid placing lights in the center of the ceiling only. Center-only lighting illuminates the middle of the room but leaves work surfaces in shadow. Think about where your body will be standing and light the surface in front of you, not the space above your head.
Yes, without question. Under-cabinet lighting is the single highest-return upgrade in kitchen lighting. It eliminates the shadows that make counter prep frustrating, it makes the backsplash visible and attractive, and it adds a layer of warmth to the kitchen that overhead lighting cannot replicate. The cost is modest relative to a full kitchen remodel. A continuous LED strip under every upper cabinet run typically costs $300 to $800 for materials, plus electrician time. Most people who add it say it should have been done from the start.